UK Made · Ships in 5–7 Days · 1-Year Structural Warranty · Klarna — 3× Interest Free ·
How to Set Up a Welding Table: Fixturing Basics for Beginners

# How to Set Up Your First Welding Table: Fixturing Basics for Beginners
If you've just got your hands on a welding table — or you're about to — the grid of holes can feel more confusing than helpful. What goes where? What clamps do you need? Where do you even start?
This guide covers the fundamentals: how a welding table actually works, how to fixture a part correctly the first time, and the basic accessories you need to get productive fast.
---
## What Is a Welding Table, and Why Does It Matter?
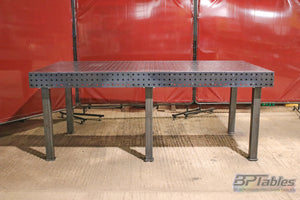
A welding table isn't just a heavy workbench. It's a reference surface — a flat, consistent plane you fixture your components against so every weld is positioned exactly where you need it.
The key features:
- **Flatness tolerance** — a good table is ground flat to within fractions of a millimetre. This matters because any distortion in your fixture position shows up in your finished part.
- **Hole pattern** — most tables use a 28mm or 16mm hole grid. These accept standardised clamps, stops, and supports, so you can build repeatable fixtures quickly.
- **Steel grade** — thicker, harder steel resists warping from heat. Cheaper tables use thinner plate that distorts over time, killing your reference surface.
BPT tables use 6mm thick S275 steel plate.
---
## Understanding the Hole Grid
The hole pattern is what makes a welding table a fixturing system rather than just a flat surface.
Each hole is a reference point. By slotting clamps, stops, and supports into these holes, you can lock your components in position relative to each other before you strike an arc. The grid means you can measure distances, repeat setups, and — critically — rebuild the same fixture next week without measuring from scratch.
**Common hole standards:**
| Pattern | Hole Diameter | Hole Spacing | Common Use |
|---|---|---|---|
| D16 | 16mm | 50mm | General fabrication, smaller tables |
| D28 | 28mm | 50mm or 100mm | Heavy fabrication, larger tables |
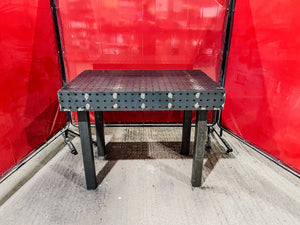
BPT Model S & L use D16, which suits most workshop fabrication and gives you a dense enough grid for smaller components.
---
## The Basics of Fixturing
Fixturing means locking your workpiece in position so it can't move during tacking or welding. Poor fixturing = distorted parts, wasted material, and joints that don't fit where they should.
### Step 1: Plan Before You Clamp
Before touching a clamp, understand what your finished assembly needs to look like:
- What are the critical dimensions? (Length, squareness, specific angles)
- Where are the joints? Are they accessible once clamped?
- Will the metal move when it heats up? (It will — plan for this)
Sketch it out, even roughly. Five minutes planning saves an hour of grinding.
### Step 2: Set Your Reference Edge
Pick one component as your datum — the piece everything else is positioned from. Place it on the table and fix it against stop pins so it can't move in any direction. Every other component gets positioned relative to this.
Don't try to position everything freehand and clamp it all at once. You'll chase your tail.
### Step 3: Use Stops, Not Just Clamps
A clamp holds things down. A stop holds things in the right position. You need both.
Stops (also called locating pins or edge stops) drop into the hole grid and give your components a hard reference to sit against. When you build the same job again, you drop the stops into the same holes and your setup is instant.
Clamps then hold the components against those stops — not doing the positioning work themselves.
### Step 4: Check Square Before You Tack
Once everything is clamped, check square before you touch the welder. A good engineer's square and a tape measure take 60 seconds. Finding a twist after you've tacked takes considerably longer.
### Step 5: Tack, Check, Weld
Don't run full welds straight away. Put small tack welds at each joint, let the assembly cool slightly, then check dimensions again. Heat input causes distortion — the fixture minimises it but doesn't eliminate it. Check as you go.
---
## Essential Accessories for a First Setup
You don't need a full catalogue of fixturing hardware on day one. Here's a sensible starter kit:
**Clamps**
The workhorse of any fixture. Toggle clamps, screw clamps, and quick-release clamps all have their place. For a general workshop, start with a set of vertical screw clamps and a few toggle clamps for fast repetitive work.
**Edge Stops / Locating Pins**
Basic stops that drop into the hole grid. Get a set that fits your table's hole standard. These are what enable repeatable setups.
**Support Blocks**
Blocks of varying heights that sit in the holes to support components above the table surface — useful when you need to weld underneath a joint or support an overhang.
**Speed Square & Engineer's Square**
Non-negotiable. Check everything is square before it goes permanent.
**Magnetic Ground Clamp**
Attaching your welder's earth directly to the table gives you a clean, consistent ground for every setup. Magnetic ground clamps attach anywhere on the table surface.
---
## Common Beginner Mistakes
**Using the clamps to force parts into position.** Clamps hold — stops position. If you're forcing a component with a clamp, something isn't aligned correctly. Find out why.
**Over-clamping.** More clamps doesn't mean more stable. Excessive clamping can introduce distortion of its own. Use the minimum clamping force that keeps the part from moving.
**Ignoring thermal distortion.** Steel moves when it gets hot. On longer assemblies, deliberately leave controlled gaps to allow for weld shrinkage. This takes practice and experience, but being aware of it from the start puts you ahead.
**Not cleaning the table surface.** Spatter on your reference surface means your components aren't sitting flat. Keep the table clean. A wire brush and a quick wipe down between setups costs nothing.
---
## A Note on Table Size
The right table size depends on what you're building, not how much space you have. A bigger table isn't always better — if your components are small, a large table just means more walking around.
The BPT Model L (2400 x 1200mm) suits fabricators working on vehicle parts, frames, brackets, and general metalwork. For a more compact workshop the BPT Model S is better suited due to the smaller footprint (1200 x 800mm).
If you're regularly working on full vehicle chassis or larger structural work, the Model L (2400 x 1200mm) gives you the extra reach.
---
## Getting Started
A welding table transforms how you work — not because it does anything magic, but because it gives you a consistent, reliable reference that lets you work accurately and repeat jobs efficiently.
Start simple: get the table flat, understand your hole grid, build your first fixture with stops and clamps, and check square before you weld. Everything else follows from there.
If you're setting up a workshop from scratch or advising an apprenticeship programme, [get in touch](https://bptables.co.uk/pages/contact) — we're happy to talk through what setup makes sense for your work.
[Browse the BPT range →](https://bptables.co.uk)